Tuesday, June 8, 2010

Ugly Mudcake

Mudcake.

The word brings about memories of rich chocolate cake purchased from the "gourmet" bakery in the "better" suburbs for a girly afternoon tea, usually to celebrate a friend's birthday.

Unfortunately, as beautifully decorated as these cakes usually are with their shiny layer of chocolate ganache and curls of white or dark (or sometimes both) grated chocolate, the insides would often be dry, dense, sickly sweet and taste a little bit processed. Bakeries often use a variety of cake/bread improvers, sugar syrups, preservatives and artificial flavours in their products to make the product more "stable" when baking, to make it last longer and to make it cheaper to produce.

So instead of trying to replicate a beautiful but tasteless cake, I'm going to tell you how to make the most gorgeous-tasting, but super ugly, chocolate mudcake!


Ugly Mudcake

(Serves 8-10)

220g butter
320g chocolate buttons (milk or dark)
1/4 cup boiling water
1/4 cup cocoa powder
1 cup caster sugar
4 eggs (only use 3 if they are 60g each or more)
1 cup self-raising flour

Preheat your oven to 150C. Grease a round cake pan and line the bottom with baking paper.

In a microwave safe bowl, melt the butter and chocolate with the water. Let it cool for a few minutes, then mix in the cocoa powder and sugar.

Gently stir in the eggs, followed by the flour.

Pour the mixture into the pan and let it sit for a few minutes before putting it in the oven. This will let some of the air-bubbles that have been stirred in rise to the surface so your cake will bake evenly.

Bake the cake for 1 1/4 hours (or until a skewer inserted comes out cleanly, with only moist crumbs clinging to it.) Let it cool in the pan for 15 minutes before turning it out onto a wire rack to finish cooling.

The result will be a mudcake that is NOT pretty. It has a habit of sinking a little in the middle no matter what I do. I've tried using more flour, baking powder, bi-carb soda - nothing will help it look prettier. But for all its ugliness, it's one of the BEST chocolate cakes I've ever made.

Ice it with a simple chocolate ganache if you'd like, but I never do. I prefer to cut a wedge, heat it a little in the microwave then serve it with some double thick cream or vanilla ice-cream.

Monday, May 31, 2010

Thai Chicken Sausage Rolls

These Thai chicken sausage rolls are simple to make and the perfect savoury finger food at any shindig! I've made them multiple times for friends and even my family. In fact, my impossibly English doesn't-like-foreign-stuff (including pasta or anything he can't pronounce) Grandfather quickly pounced on the last sausage roll on the plate when the entire family was last around and proclaimed them "quite tasty".


Thai Chicken Sausage Rolls

600g chicken mince

1/3 cup breadcrumbs
1/2 tbsp ground cumin
2 tbsp sweet chilli sauce
2 tbsp coriander, finely chopped
Puff pastry sheets
1 egg, lightly beaten
Sesame seeds

Preheat oven to 200C and line two baking trays with greaseproof paper.

In a large bowl mix together the mince, breadcrumbs, ground cumin, sweet chilli sauce and coriander.

Lay out a sheet of puff pastry and cut it in half (so it's a rectangle). Take one of the halves, spread some of the mixture along one edge of the pastry sheet and roll up to conceal the filling. Brush with egg to seal the pastry closed. Repeat this process with the remainder of the mince filling.

Slice each "roll" into four or five pieces and place them on the baking trays, seam side down. Brush the rolls lightly with the beaten egg and sprinkle with sesame seeds.

Bake for 25 minutes and serve with extra sweet chilli sauce. Oh, and be careful to let them cool before you bite into them. (Something I find difficult to do!)

Saturday, May 29, 2010

Butterscotch Pudding

It's almost winter here in Australia so time to bring out lovely warm wintery puddings, stews and casseroles!

This is a very simple, fool-proof and sticky-sweet butterscotch pudding.

Butterscotch Pudding
(Serves 6)

Oil spray (for greasing)
150g self-raising flour
80g brown sugar
1/2 cup milk
60g melted butter
1 egg
2 tbsp golden syrup or treacle
100g brown sugar (extra)
3 tbsp golden syrup or treacle (extra)
1 1/4 cups boiling water

Preheat the oven to 170C and lightly grease a 1.25L oven-proof dish with the oil spray. Place it on a large, flat baking tray (just in case of any over-flow!)

Sift the flour into a large bwol and stir in the brown sugar, making sure to squash any lumpy-clumpy bits of sugar.

In a jug, whisk together the milk, melted butter, egg and golden syrup then slowly pour it into the flour/sugar mixture and beat until it is all well combined and free of lumps. Pour the mixture into the greased dish.

Sprinkle over the extra brown sugar. Then in a small jug (or bowl), stir together the extra golden syrup and boiling water. Pour this over the pudding. The brown sugar will appear to dissolve into the syrup.

Bake the pudding for 45 minutes then set aside for 10 minutes. Two reasons why - one is so the butterscotch sauce (which has gone all gooey and sunk to the bottom of the pudding) thickens and goes even gooier. The second reason is so the pudding cools slightly and the chances of burning the roof of your mouth and losing the skin there diminishes slightly!

Serve a big spoonful of the pudding with plenty of the sauce and a large mound of vanilla ice-cream or double-thick cream.

Monday, May 24, 2010

Saffron risotto

This is a dumbed down version of a Milanese risotto. A traditional Milanese risotto is made with beef stock, beef bone marrow and lard (instead of butter). But to be honest, bone marrow kind of creeps me out, and I don't tend to keep lard in the fridge.


Saffron Risotto
(Serves 2, as a main meal)

3/4 cup dry white wine
Pinch of saffron
Olive oil
1 onion, finely diced
50g butter
1 garlic clove, crushed
1 cup Arborio rice
1L hot chicken stock
1/4 cup grated parmeson

Add saffron to the wine and let it infuse whilst you begin the risotto.

In a non-stick saucepan, heat the oil over medium heat and gently fry the onion until it has softened. Add the butter and garlic. When the butter begins to froth, add the rice. Stir well so all the rice gets covered in the butter. Add the saffron infused wine and stir the rice really well until the wine has been absorbed. This will release the starches in the rice and make the texture creamy.

Add the stock, one cup at a time. Stir often and when the stock has been absorbed, add another cup.

Once all the stock has been absorbed, season well with salt and pepper. Add the grated parmesan and stir until it has melted into the risotto.

Saturday, May 15, 2010

Food Porn from the South West

Pete and I recently went on a trip around the South West of Western Australia. We stayed in Albany, Walpole and Pemberton. We had planned on going to Bridgetown and Margaret River too, but I got sick so we decided to come home early and go down to Bridgetown and Margaret River a little later in the year.

Although this is a recipe blog, I've decided to post a few "food porn" photos ala The Food Pornographer. (I'm a total die-hard TFP fan!)
This is the breakfast we had when we stayed at a place called Saltair down in Albany. This was honestly the highlight of our stay! Freshly pineapple juice, a sweet apple and walnut loaf with butter and the cereal which was divine! I'm deserate to re-create it at home - it contained bran flakes, honey toasted muesli, dried fruits, roasted almonds and a variety of seeds.

One day whilst roaming Albany we stopped for fish and chips (with a few calamari rings) at a beach-side kiosk. We decided to take advantage of the good weather and eat outside with a pretty spectacular view.


On the drive from Albany to Walpole, we stopped to spend some time in beautiful Denmark. I'd heard about the award-winning bakery so decided that we HAD to stop there for lunch. I'm SOOO glad we did!!! The bakery definitely deserves all its awards! I had a steak and mushroom pie that was so full of flavour. On a cold day, it definitely hit the spot! And Pete also loved his lamb and rosemary pie.


On our first day in Pemberton we went to Hidden River for lunch. Hidden River is a gorgeous little boutique winery/cafe. Last year I had the Malaysian laksa and just had to have it again this year! It's full of prawns, fish and boy choy in a spicy coconutty broth.


This is the grilled trout, salad and chips from the King Trout Cafe - it may not look super exciting but it tastes great - the trout was literally swimming 20 minutes before I ate it and the chips were so fresh and hot and crispy. They were the best chips I've had in ages actually....


We went to the Lavender and Berry farm and couldn't wait to eat another of their gorgeous pies like what we had last year. Sadly, the farm has changed hands. This is the chicken and corn pot pie we ate this year (with fried potato rounds and salad). It was bland, and the inside of the pie tasted a bit, well.... old! Like it had been sitting in the fridge for a few days before being served up to me.


Just for contrast, this is what we were served up last year - this pie is a proper pie, filled with a lovely Thai chicken curry with the fried potato rounds and salad. It also came with homemade tomato and basil sauce which has a flavour like nothing I've tasted before! It was great so I was definitely disappointed this year.


We saved the best til last!!! The Wine and Truffle Co in Manjimup is my favourite place to eat. A glass of wine and their toasted hazelnut bread smothered with truffle butter makes me ever so happy! :-)

Monday, April 26, 2010

Lemon Loaf

I felt like cooking something sweet a couple of weeks ago, but since it had recently been Easter and I was still suffering a chocolate overdose, I didn't really want to cook with that which usually runs through my veins!

It was late at night (no shops were open to get fresh ingredients) so I had to make do with what I had in the pantry. I had the basics and a few lemons knocking about the fruit drawer of the fridge. After going through a few cookbooks and my fave recipe website I settled on a lemon loaf recipe from the Taste.com.au.

Six ingredients and an hour later, I was sitting down with a big cup of tea and munching on a lovely warm piece of cake.

The cake itself was gorgeous! It was light and fluffy with a wonderful sweet/sour topping made by combining some lemon juice and sugar. This cake is one my darling Pete has practically begged me to make again. (A sure sign this recipe is a keeper!)

You can get the recipe here: http://www.taste.com.au/recipes/9184/lemon+loaf

Tuesday, April 6, 2010

Chocolate Birthday Cupcakes

For your simple viewing pleasure - here is a rich chocolate cupcake I made my darling Pete last week for his 28th birthday.


It's decorated with vanilla buttercream, white sprinkles and (of course!) a candle.

The recipe itself is nothing special, but here's a hint for all you bakers out there - dissolve a teaspoon of instant coffee granules in a tablespoon of boiling water before adding it to the cupcake mixture. (Note: this amount is suitable for a batch of 12.) The coffee flavour isn't obvious but it creates a slight bitterness which off-sets the sweetness of the chocolatey cake.

And Pete loved his cupcakes! :)

Friday, April 2, 2010

Giambotta

Everyone knows what ratatouille is. The main ingredients are garlic, onions, tomatoes, zucchini, eggplant, capsicum/peppers and herbs. It's light, healthy and an awesome way to increase your veggie intake. :)

The Italians have their own version of ratatouille called giambotta. Similar ingredients, different herbs and in my opinion, so much tastier!

Now, this giambotta recipe is pretty flexible - if you hate zucchini, supplement it with eggplant, if you prefer green capsicums to red, then use green. Play around with the types of vegetables and make the giambotta to suit your own tastes.


Giambotta
(Serves 2)

Olive oil
2 cloves garlic, crushed
1/2 onion, finely sliced
5 button mushrooms, quartered (I tend to use tinned champignons if the veggie crisper is looking a bit pathetic and empty!)
1 zucchini, cut into chunks
1 red capsicum/bell pepper, cut into chunks
1 chilli, deseeded and sliced
3/4 cup vegetable (or chicken) stock
3 ripe Roma tomatoes (or 1/2 tin of tomatoes), chopped into large chunks
Freshly shredded basil
Salt and pepper

Heat a splash of olive oil in a large non-stick pot or pan. Over medium heat, saute the garlic, onion and mushrooms until the onion has softened a little.

Add the zucchini, capsicum and chilli and saute for a minute or two. Add the stock, turn the heat down and simmer very gently for about 5-10 minutes. Add the tomatoes then simmer for a further 10 minutes or until the veggies are very tender and the stock has been mostly absorbed.

Stir in the fresh basil and season well with salt and freshly cracked black pepper.

Serve the giambotta topped with a fried egg or plenty of crusty sourdough bread to mop up the veggie juices.

Alternatively, blend the giambotta for a sneakily healthy pasta sauce that the kids will never know is made up of veggies!

Thursday, March 25, 2010

Fettuccine in a Creamy Mushroom Sauce

This is a simple mid-week meal I created when I had next to nothing in the house except for a few mushrooms. It was simple to cook and very yummy to eat!

You can use any mushrooms you like (or have loitering in the vegetable crisper) for this recipe. I used button mushrooms. You'll also notice that the sauce is not purely cream - I find using a mix of cream and stock reduces the richness and makes the meal a lot lighter.


Fettuccine in a Creamy Mushroom Sauce
(Serves 4)

400g fettuccine
50g butter
1 garlic clove, crushed
1/2 onion, finely chopped
350g mushrooms, sliced
1/2 cup cream
1/2 cup chicken or vegetable stock
Chopped parsley

In a large saucepan of boiling water, cook the pasta until al dente.

At the same time, melt the butter in a saucepan over medium heat and saute the garlic, onion and mushrooms until they have all softened (about 3-5 minutes - the onions will look slightly translucent). Add the cream and stock and simmer gently until the sauce has reduced a little.

Toss through the cooked pasta and parsley.

Thursday, March 11, 2010

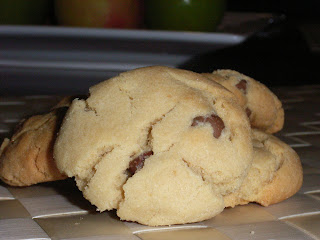
Chocolate Chip Cookies

Everyone loves chocolate chip cookies (or biscuits, if you'd prefer to call them that.) Except when those chocolate chip cookies have about three chocolate chips in them. Per batch. Not cool!

The beauty of making them yourself is that you can control the chocolate content. And the type of chocolate! Tiny white chocolate chips, or large bitter dark chocolate chunks. The choice is yours.


Choc Chip Cookies
(Makes 36)

150g butter
1/2 cup caster sugar
1/2 cup brown sugar
1/2 tspn vanilla extract (or 1 tspn vanilla essence)
1 egg
1 3/4 cups self-raising flour
1/2 tspn salt
125g chocolate chips

Preheat the oven to 180C and line two baking trays with baking paper.

In a mixer (or using a set of electric hand beaters) beat the butter, sugars and vanilla until it forms a thick, pale and fluffy mixture. Slowly beat in the egg.

Stir in the sifted flour and salt, then add the choc chips (or chunks ;p ).

Roll the dough into small balls (about two teaspoons full) and place on the baking trays. Don't squash them down - just leave them as little balls otherwise they'll spread too much and look like flat discs rather than chunky biscuits.

Bake the cookies for about 10-12 minutes in the oven, or until they look pale gold. Transfer them to a wire rack to cool (or be eaten, whichever comes first!)